本文共 2027 字,大约阅读时间需要 6 分钟。
一、温故
关于CSS3 clip-path, 去年圣诞节前前前夕写了篇名为“”文章介绍了。不过是简介,很多内容是一笔带过。
CSS3中的clip-path可以遮罩很多图形,例如矩形rectangle, 圆circle, 椭圆ellipse, 多边形polygon, 以及inset剪裁。
其中,polygon多边形构建频频出现了我的视野中,不知是贪图我的美色还是其他什么原因,总之,它成功了,成功引起了我关注。于是,按照虐心剧剧本一贯的尿性,男主和X主发生了很多情感上的纠葛。这里特意呈现给大家,满足大家八卦的天性。
二、成形
clip-path的前身是SVG, 所以,我们的坐标都是二维的。
polygon的作用就是根据二维点坐标,依次连线,最后所形成的区域就是我们的遮罩区域了。
关于使用polygon构建标准多边形,可以看这里:
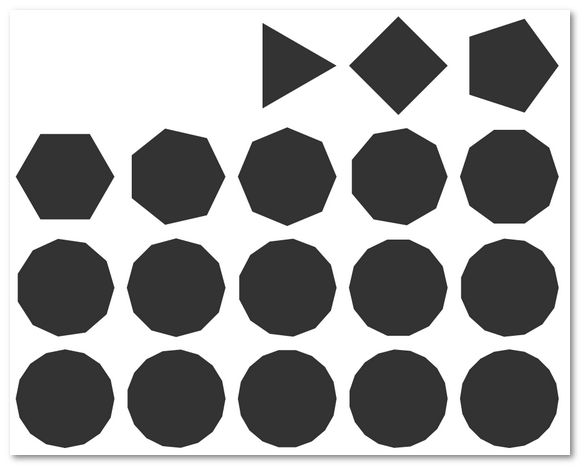
上面截图就是1个点~20个点绘制的多边形效果。大家可以看到趋势,点越多,最后的多边形越接近圆形。所以,如果你要是闲的蛋疼,可以用100个点模拟一个圆。
我们实际应用的时候,5个角以上的多边形是不会用到的。
最常用的估计就是三角效果了。
10年的时候有介绍“”,可以使用border属性生成各类三角效果:
更之前的09年还介绍过。
相比而言,clip-path家族的polygon生成三角要更简单也更强大。
打个背景色,搞三个点就可以了,例如(自身尺寸20px*20px):
.path { clip-path: polygon(5px 10px, 16px 3px, 16px 17px);} 于是呈现:
当然,我们可以把其中任意一个点的坐标弄偏一点,于是,我们就可以出炉一个不规则的三角效果,这是之前三角生成技术所不具备的。
//zxx: 相关Demo见下一节。
当然,polygon的潜力远不止这点伎俩,polygon对点的数目没有限制,所以,对于实现图形效果,限制我们的反而是我们的想象力。比方说,我们要实现一对三角效果,我们可以这么设计我们绘制路线(下图截自):
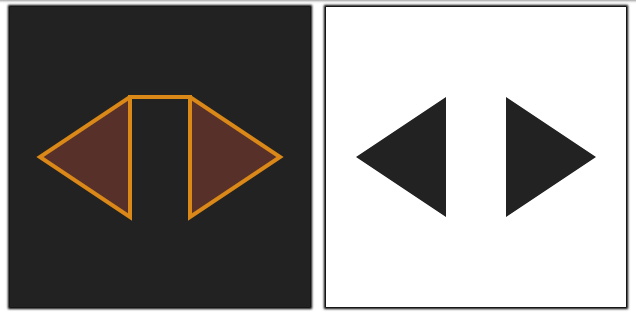
当然,那条横向你也可以放在中间,或者下面。
上图展示了polygon一个很棒的特性,就是,如果两个点最终仅仅形成的是一条线的话,是没有任何填充与遮罩的。于是乎,发挥我们的想象力,我们几乎可以构建各种各样的多边形图形。配合CSS3 background以及渐变等N多强大特性,我们可以实现很多很棒的效果!
唉,上年纪了,没有精力搞漂漂的示例了,大家自行脑补。

三、变形
CSS3 clip-path近期频频亮相的另外一个原因就是可以transition过渡或者animation动画。于是,我们可以实现很多棒棒哒的效果。比方说——不规则图形变换效果,很好地填补了CSS3 transform变换的不足。
transform变换本质是基本矩阵变换,因此,也就是转一转,拉一拉。对于,复杂图形变换效果,比方说,矩形变成三角,乌龟变小鸟之类的,就只能望码兴叹了。然,clip-path就可以搞定。
由于polygon规则限制少,任意多边形,只要边是直的就行,比圆之类的定死的图形发挥的空间更大。因此,polygon更受设计师和相关前端人员的热爱。
然而,polygon的动画变形不是无条件的,且看~
您可以狠狠地点击这里:
demo操作如下视频演示:
大家自行看会发现,从1个三角变成2个三角的时候,是没有过渡效果的。这就是polygon的动画变形的一个重要条件:坐标的数目变形前后必须一致。
只要polygon点坐标的数目在动画的前后数目一样,浏览器就能实现连续动画,哪怕图形前后的模样是凤姐和林志玲的差距。比如说上面视频最后一个,2个三角变成1条鱼的过渡效果。
相关polygon坐标代码如下:
.path6 { clip-path: polygon(5px 10px, 16px 3px, 16px 9px, 36px 9px, 36px 3px, 47px 10px, 36px 17px, 36px 11px, 16px 11px, 16px 17px);}.path7 { clip-path: polygon(5px 11px, 5px 9px, 16px 3px, 26px 3px, 40px 9px, 48px 15px, 48px 5px, 40px 11px, 26px 17px, 16px 17px);} 四、眼界
本文说到现在所展示的polygon应用只是皮毛,虽然说原理就这么回事,但是,人类之所以为人类,创意和想象力是非常重要的,小小的polygon,如果遇到非常棒的设计师加上非常棒的idea, 最后,就是让人大开眼界的视觉盛宴!
大漠在微博上分享的这个网站:
推荐大家都去瞅瞅,30个动物,30种变换,主要就是使用clip-path polygon实现,下面就是我截取的部分视频:
欢迎发表观后感!
转载地址:http://hzvwz.baihongyu.com/